How to change Boot LOGO & BIOS ver.
for ASRock B360M mobo
- Part 1: BIOS rewriting H/W : SPI Writer
- Part 2: BIOS rewriting S/W :New CPU support
- Part 3: BIOS modification: PMC F/W updating
- Part 4: BIOS modification: ME area cleanupsleep defect countermeasures
- Part 5: BIOS modification: GOP/ V BIOS update method
- Part 6: BIOS modification: background knowledge-BIOS file structure
- Part 7: How to change the Boot LOGO & BIOS ver.: this page
Document history: 2021/ 4/13 1st time up
- Change BIOS Version number
- BIOS boot LOGO screen change
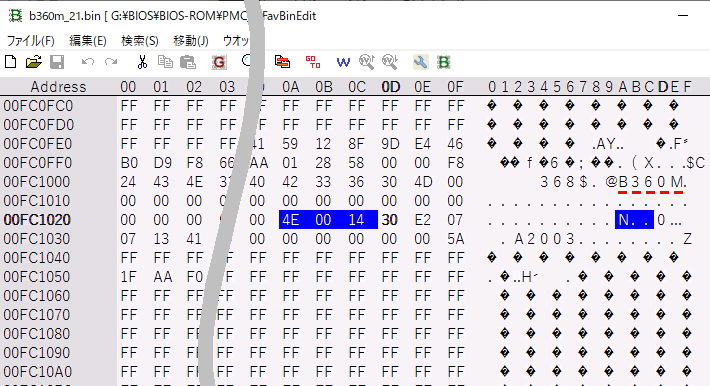 Anyway, I opened the modified BIOS file with Binary Editor and searched for string "B360", and found only one hit. Behind it was the binary data "4D 00 0B" ("4D" is ASCII charactor "M", hexadecimal "0B" is converted to decimal "11"). So I changed this to "4E 00 14". (Version number N.020 has no deep meaning, but M > N, 011 > 020 and the claim that it is a new series version.)
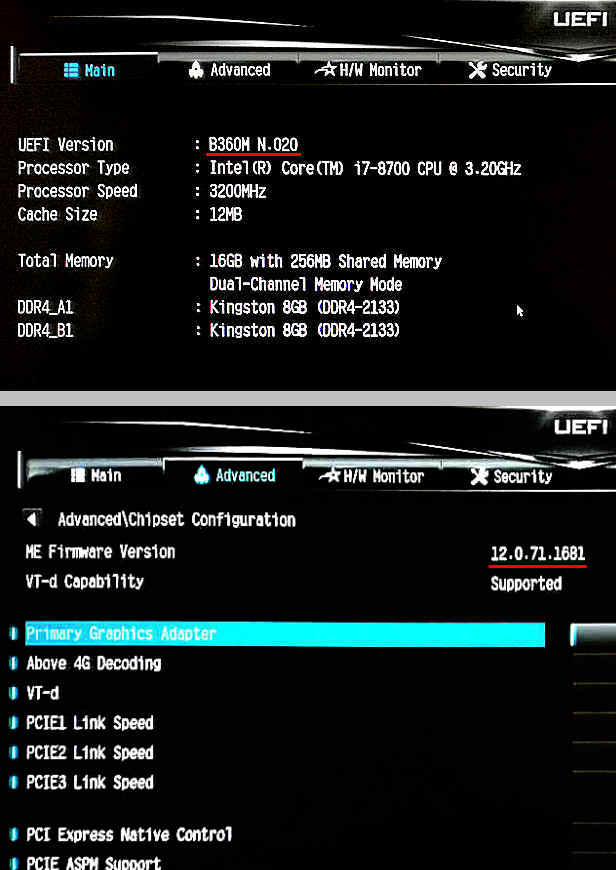 After writing the above edited BIOS file using the SPI writer, I booted up the PC and looked at the UEFI setting screen, the version display was changed from "M.011" to "N.020" as expected, and the ME Firmware Version is "12.0.71.1681" (ME Firmware Version has changed due to the update of PMC F/W code on the previous page). This had completed the "Modified BIOS Update" in both name and reality.
However, until now, even if I thought that it had "cured", it had recurred in a few days, but this time it has not yet occurred on the fifth day. It looks promising.
03(Mar.)/20: postscript
After that, I modified the version of various module such as VBIOS / GOP-VBT, Disk Controller and Network. And During that time, no sleep problems occurred. So I'm confident that the process here has made a noticeable improvement.
It doesn't matter because it has nothing to do with the function, but since the original English page also has a topic about changing the LOGO, I thought about changing this LOGO "in the meantime".
 At first , I thought that it could be easily changed with "ChangeLogo.exe" that was in the tree of the topic, but although the LOGO file can be extracted, even if the extracted file is specified as it is and replaced, it is as shown in the figure on the right, it hangs up as "no response".
< Preparation of changed image >
However, the extracted file was in uncompressed BMP format, so I edited the LOGO image in the same size (462x97 pixcel) with normal image processing software and saved it to the file format "Windows BMP" compressed format "uncompressed (RGB)".
< Replacement of LOGO file >
There is no help for Replace, so I changed it according to the following procedure.
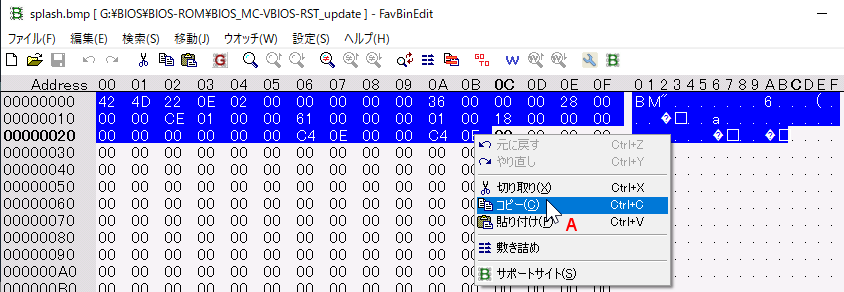
A. First, open the extracted file (in this case, extracted as an uncompressed BMP file) with a binary editor and copy the first 40 - 44 bytes of Hex data.
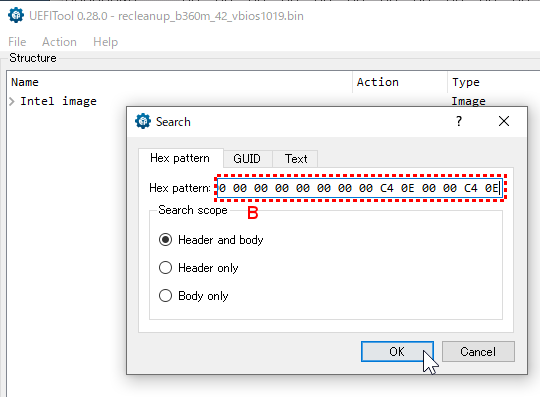
B. Open the BIOS file to be changed with UEFI Tool (official version), and paste the above copied Hex data with "Search" command in file menu to search. (The pasted data has a large number of digits and can be searched without problems even if it overflows from the text box.)
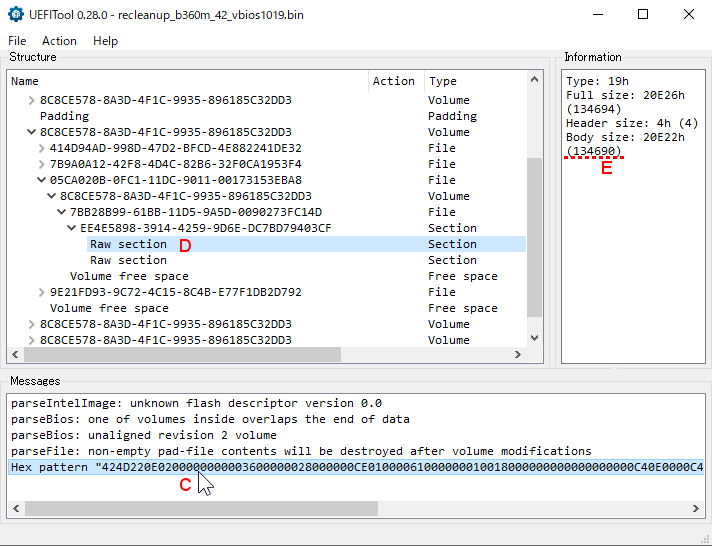
C. When the search results are displayed in the "Messase" pane below, double-click that part.
D. The structure of the module containing the LOGO data is expanded and displayed in the "Structures" pane above. If you click on the "Raw section" part above the expanded version
E. The file size is displayed in the Body Size section of the Infomation pane on the right, but make sure that this value matches the size of the extracted BMP file.
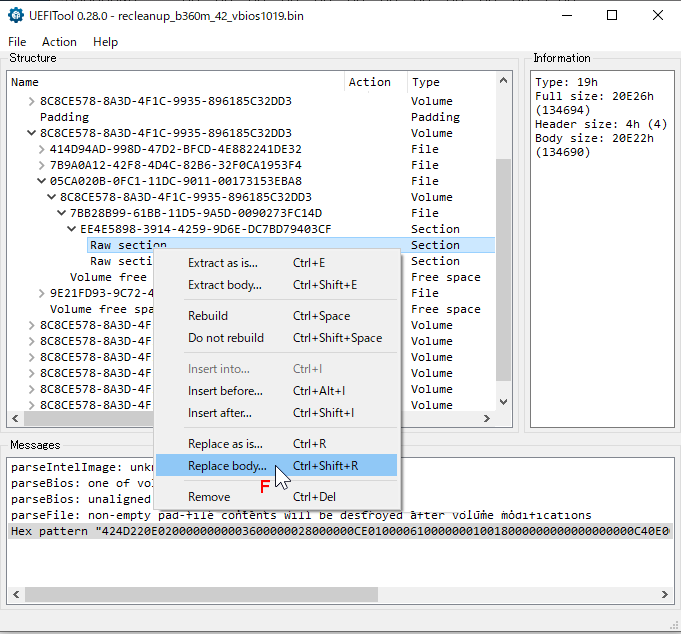
F. Right-click on "Raw section" and select "Replace body" from the displayed menu.
The file specification dialog is displayed, so specify the image file to be replaced.
G. Save the BIOS file with a new name in File> Save image file.
The figure on the right is a comparison before and after changing the completed logo part. I played with fonts and colors for a moment.
Every time I used to turn on the PC, the "iiyama" logo looked shameful a bit becaouse of the sleep error, but this time I feel somehow satisfaction with the new LOGO. I succeeded the BIOS modification as I wanted with a lot of difficulties.
What I've written here is just what I've seen in my environment and often doesn't apply under even the slightest difference. Also, there may be my misunderstandings and mistakes, so even if you operate as explained, it may not always be possible to convert.
From the beginning, updating or modifying the BIOS is a dangerous task that may cause the PC to not start (= become oversized garbage) if one mistake is made. Therefore, even if you refer to it, please do so at your own risk.
Access Counter: